
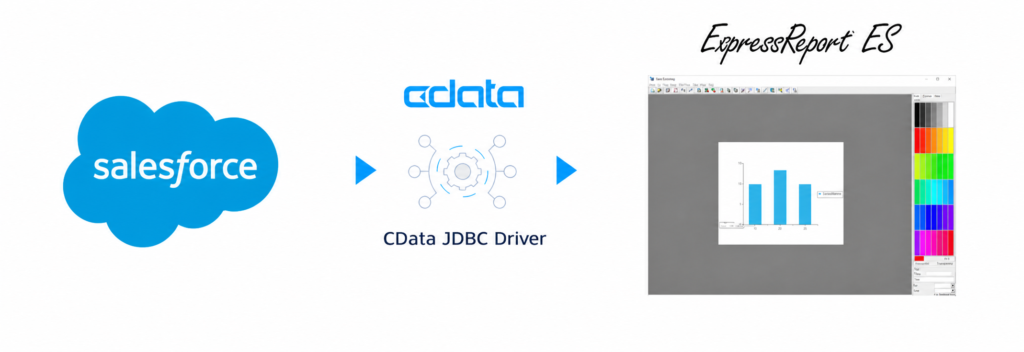
In this article, we will explain how to access Salesforce data from EspressReport ES (ERES) by using the CData JDBC Driver for Salesforce. We are using Windows for this example and assume that ERES is installed in C:\ERES. (Please note that the CData JDBC Driver for Salesforce can be deployed in EspressChart, EspressReport, and EspressDashboard in a similar manner.)
CData provides JDBC drivers for Salesforce and many other cloud services and SaaS applications. By combining the CData JDBC driver with the JDBC connection functionality in ERES, Salesforce objects such as Contacts, Accounts, Leads, and Opportunities can be used as data sources for reports and charts.
Set Up a Salesforce Developer Edition Account
If you do not already have a Salesforce environment for testing, create a free Developer Edition account:
- Open the Salesforce Developer Edition signup page.
- Enter your contact details and email address.
- Enter a unique username. Salesforce usernames use an email-address format, but the username does not have to be the same as your contact email address.
- Click Sign Me Up.
- Open the verification email from Salesforce and verify the account.
- Set the account password and log in to the new Salesforce environment.
Import Sample Contact Data
The following sample data can be used to create ten Contact records for this example. Save it as salesforce_contacts.csv.
FirstName,LastName,Email,Phone,Title,Department
John,Doe,[email protected],555-0101,Manager,Sales
Jane,Smith,[email protected],555-0102,Director,Marketing
Michael,Johnson,[email protected],555-0103,Engineer,IT
Emily,Williams,[email protected],555-0104,Analyst,Finance
David,Brown,[email protected],555-0105,Consultant,Operations
Sarah,Davis,[email protected],555-0106,Coordinator,HR
Robert,Miller,[email protected],555-0107,VP,Sales
Laura,Wilson,[email protected],555-0108,Specialist,Marketing
James,Moore,[email protected],555-0109,Developer,IT
Linda,Taylor,[email protected],555-0110,Accountant,Finance
To import the file with Salesforce Data Import Wizard:
- In Salesforce, click the gear icon in the upper-right corner and select Setup.
- Enter Data Import Wizard in the Quick Find box and select Data Import Wizard. It can also be found under Platform Tools > Integrations.
- Click Launch Wizard.
- Under Standard Objects, select Accounts and Contacts.
- Select Add new records.
- Select CSV, upload salesforce_contacts.csv, and continue to the field-mapping step.
- Confirm that each CSV column is mapped to the corresponding Contact field.
- Review the settings and start the import.
Salesforce processes the import in the background and sends an email when it is complete. You can also review its status in the Recent Import Jobs section of Data Import Wizard.
Because this sample file does not include an Account field, Salesforce creates the records as private Contacts owned by the importing user. This is sufficient for the connection test. For production data, include and map an Account name or Account ID when the Contacts must be shared with other Salesforce users.
Install the CData Salesforce JDBC Driver
Download the Windows trial installer from the CData Salesforce JDBC Driver download page.
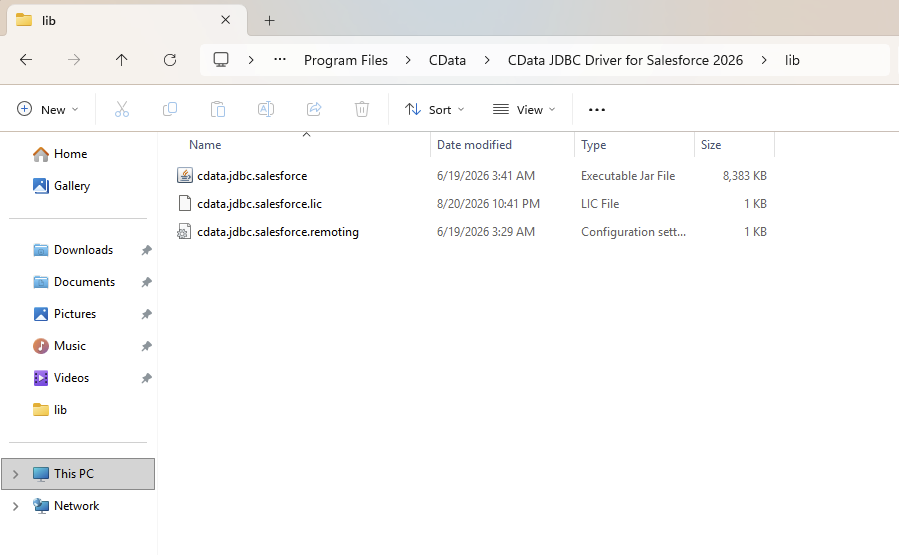
Run the installer and complete the setup according to the installation dialogs. With the 2026 Windows driver, the library files are normally installed in C:\Program Files\CData\CData JDBC Driver for Salesforce 2026\lib.
The main driver class is cdata.jdbc.salesforce.SalesforceDriver.
Create and Test the OAuth Connection
OAuth is the preferred authentication method because it allows Salesforce to authorize the connection without storing a Salesforce password in the ERES data registry.
The CData driver includes a connection string builder. Open cdata.jdbc.salesforce.jar from the driver’s lib directory, or run java -jar “C:\Program Files\CData\CData JDBC Driver for Salesforce 2026\lib\cdata.jdbc.salesforce.jar” from a command prompt.
For a predictable ERES deployment, specify the settings location explicitly during the initial interactive connection: jdbc:cdata:salesforce:AuthScheme=OAuth;InitiateOAuth=GETANDREFRESH;OAuthSettingsLocation=C:\CData\sf-oauth.txt;.
Note: For a quick interactive test, OAuthSettingsLocation can be omitted by using jdbc:cdata:salesforce:AuthScheme=OAuth;InitiateOAuth=GETANDREFRESH;. CData then stores the OAuth settings under the current user’s default profile location. Because the Tomcat service may run under a different Windows account, ERES may not be able to find that file. Use the explicit settings location shown above for the ERES deployment.
Click Test Connection. The driver opens Salesforce in the default browser. Log in to Salesforce and approve the requested access. After authorization succeeds, the driver creates C:\CData\sf-oauth.txt and stores the encrypted OAuth values there.
The driver needs read and write access to this file so that it can refresh the OAuth token when necessary. Treat the file as a credential: restrict its permissions, do not place it in a public web directory, and do not commit it to source control.
If Salesforce returns an invalid_client error, a Salesforce administrator may need to install or authorize the embedded CData Connector application. In Salesforce, click the gear icon and select Setup. Enter OAuth in the Quick Find box, and then select Connected Apps OAuth Usage. Locate CData Connector. If the Action column displays Install, click it and confirm the installation. If the application is blocked, click Unblock. Then repeat the CData connection test.
Deploy the JDBC Driver in ERES
Copy the following files from the CData lib directory into the ERES library directory:
- cdata.jdbc.salesforce.jar
- cdata.jdbc.salesforce.lic
For this example, the destination is C:\ERES\WEB-INF\lib.
The .lic file must remain in the same directory as the JAR file. After copying the files, restart the Tomcat server where ERES is deployed.
Start ERES Organizer
Log in to ERES and select Organizer from the left menu. Launch the downloaded Organizer application, and then click Data Registry Manager.
Click Add and create a Data Registry with a name of your choice. After creating the registry, select Database and click ADD to create a database connection.
Add the Salesforce Data Source
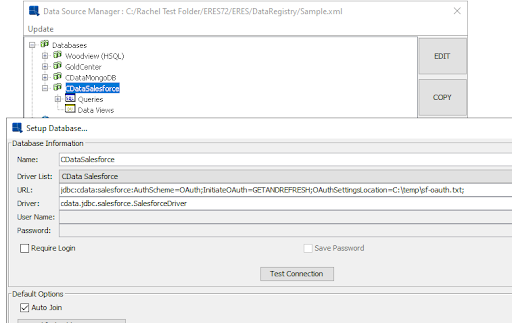
Configure the connection as follows:
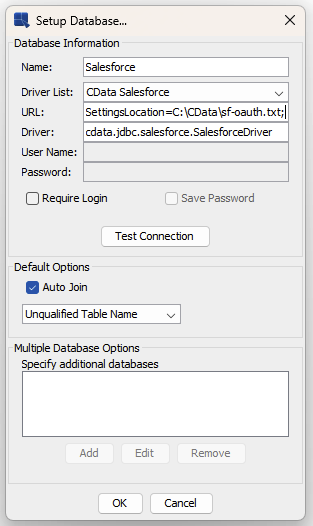
Because the initial OAuth authorization has already been completed, use jdbc:cdata:salesforce:AuthScheme=OAuth;InitiateOAuth=REFRESH;OAuthSettingsLocation=C:\CData\sf-oauth.txt; in ERES.
If CData Salesforce is not available in the Driver List in an older ERES installation, select Other and enter cdata.jdbc.salesforce.SalesforceDriver in the Driver field.
Click Test Connection. If the driver, license, OAuth file, and Salesforce permissions are configured correctly, ERES will display a successful connection message.
Add a Query
After adding the Salesforce connection, select Queries under the connection and click ADD. Enter a name for the query and open the Query Builder.
Select the Salesforce Contact object and add the fields required for the report. For the sample data, select:
- FirstName
- LastName
- Phone
- Title
- Department
The equivalent SQL query is:
SELECT FirstName, LastName, Email, Phone, Title, Department
FROM Contact
The CData driver presents Salesforce objects through JDBC and translates the SQL request for Salesforce. Use the Datasheet View to confirm that the imported Contact records are returned, and then save the query.
Create a Report or Chart
After saving the query, select it in Organizer and click VIEW. Choose Create Report or Create Chart, and complete the corresponding designer wizard.
The resulting report or chart uses live Salesforce data through the CData JDBC connection. When Salesforce records are updated, refreshing or rerunning the ERES output retrieves the current data.
Using OAuth on a Separate or Headless ERES Server
If ERES runs on a server where a browser cannot be opened, complete the first OAuth authorization on a desktop computer:
- Install the CData driver on a computer with a browser.
- On that desktop computer, open cdata.jdbc.salesforce.jar from the CData driver’s lib directory to launch the CData connection string builder and test tool.
- In the CData tool, use a JDBC URL with InitiateOAuth=GETANDREFRESH and an explicit OAuthSettingsLocation, such as jdbc:cdata:salesforce:AuthScheme=OAuth;InitiateOAuth=GETANDREFRESH;OAuthSettingsLocation=C:\CData\sf-oauth.txt;. Click Test Connection, then log in to Salesforce and approve access when the browser opens.
- After the test succeeds, securely copy the generated OAuth settings file from the specified location to the ERES server.
- Give the Tomcat service account read and write access to the copied file.
- Configure the ERES JDBC URL with InitiateOAuth=GETANDREFRESH and the file’s path on the ERES server.
For example, use jdbc:cdata:salesforce:AuthScheme=OAuth;InitiateOAuth=GETANDREFRESH;OAuthSettingsLocation=C:\temp\sf-oauth.txt;.
For production deployments, a Salesforce administrator may require a custom Salesforce OAuth application rather than CData’s embedded OAuth application. In that case, add the OAuthClientId and OAuthClientSecret supplied for the custom application, following the CData Salesforce JDBC Driver documentation.
Conclusion
By using the CData Salesforce JDBC Driver with EspressReport ES, Salesforce data can be added to an ERES Data Registry and used in reports and charts without writing a custom Salesforce API integration. The same approach can be used with other Salesforce objects and queries according to the reporting requirements.